Step 6 - Set Up Your Portal Lead Generation
In order to capture leads on your WordPress site, you will need to make sure your portal is turned ON in your Flexmls account. You can verify this by going to Menu > Preferences > Portal Preferences
OAuth Credentials
Please email your OAuth Redirect URI (under Flexmls IDX > Settings > Portal) with the subject 'OAuth Credentials' to idxsupport@flexmls.com in order to get an Oauth Client Key/Secret for your site. Also, please include your plugin key you were sent in the getting started email from us.
This setting can be found under Flexmls IDX > Settings > Portal tab
Portal Save Search and Favorites
- Enable Listing Carts: Check Enable favorites, possibilities, and rejects on search results and detail pages” to add the listing marking icons to your search results and detail pages.

- Enable Saving Searches: Enable saving searches on search results pages. This setting will add a button to the top of your search result pages to allow portal users to save their searches.

Portal Registration Popup

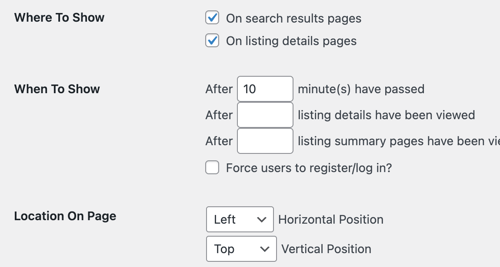
- Where To Show: This option will allow you to where you want the popup window to display.
- When to show: With this setting you will be able to set when your visitors will be asked to register/login. You can also force users to register/login
- Force users to register/login: By checking this setting, it will remove the 'Not Now' link that appears in the registration/log-in window. When a user is able to click on 'Not Now', it allows them to continue looking at the listing details without registering or logging in.
- Location on page – This will allow you to choose where on the page you want the pop-up to display.
- Portal Registration Text – Here you will be able to change the text that displays in the login window.

Contact Settings
If your Contact Manager requires your website to apply a disclaimer to your forms, you can apply it in the text field below. The applied text will be wrapped in <small> HTML tag.
This text is applied to the Contact Me widget and Contact Agent form within the Listing Detail pages.

